9. 影像調整:轉換影像內容#
9.1. 色彩操作#
大多數用於操作色彩通道的函式都位於子模組 skimage.color 中。
9.1.1. 色彩模型之間的轉換#
彩色影像可以使用不同的色彩空間來表示。最常見的色彩空間之一是RGB 空間,其中影像具有紅色、綠色和藍色通道。然而,其他色彩模型也廣泛使用,例如HSV 色彩模型,其中色相、飽和度和明度是獨立的通道,或者用於列印的 CMYK 模型。
skimage.color 提供實用函式,可將影像轉換為不同色彩空間並從不同色彩空間轉換。整數類型陣列可以透過轉換操作轉換為浮點類型
>>> # bright saturated red
>>> red_pixel_rgb = np.array([[[255, 0, 0]]], dtype=np.uint8)
>>> color.rgb2hsv(red_pixel_rgb)
array([[[ 0.,  1.,  1.]]])
>>> # darker saturated blue
>>> dark_blue_pixel_rgb = np.array([[[0, 0, 100]]], dtype=np.uint8)
>>> color.rgb2hsv(dark_blue_pixel_rgb)
array([[[ 0.66666667,  1.        ,  0.39215686]]])
>>> # less saturated pink
>>> pink_pixel_rgb = np.array([[[255, 100, 255]]], dtype=np.uint8)
>>> color.rgb2hsv(pink_pixel_rgb)
array([[[ 0.83333333,  0.60784314,  1.        ]]])
9.1.2. 從 RGBA 轉換為 RGB - 透過 Alpha 混合移除 Alpha 通道#
將 RGBA 影像轉換為 RGB 影像,方法是將其與背景進行 Alpha 混合,這可以使用 rgba2rgb() 實現
>>> import skimage as ski
>>> img_rgba = ski.data.logo()
>>> img_rgb = ski.color.rgba2rgb(img_rgba)
9.1.3. 色彩和灰度值之間的轉換#
將 RGB 影像轉換為灰階影像可以使用 rgb2gray() 實現
>>> img = ski.data.astronaut()
>>> img_gray = ski.color.rgb2gray(img)
rgb2gray() 使用不均勻的色彩通道加權,因為人眼對不同色彩的敏感度不同。因此,這種加權確保了從 RGB 到灰階的亮度保留
>>> red_pixel = np.array([[[255, 0, 0]]], dtype=np.uint8)
>>> ski.color.rgb2gray(red_pixel)
array([[ 0.2125]])
>>> green_pixel = np.array([[[0, 255, 0]]], dtype=np.uint8)
>>> ski.color.rgb2gray(green_pixel)
array([[ 0.7154]])
使用 gray2rgb() 將灰階影像轉換為 RGB 只需在三個色彩通道上複製灰度值。
9.1.4. 影像反轉#
反轉影像也稱為互補影像。對於二元影像,True 值變為 False,反之亦然。對於灰階影像,像素值會被資料類型最大值與實際值之差取代。對於 RGB 影像,每個通道都會執行相同的操作。此操作可以使用 skimage.util.invert() 達成
>>> import skimage as ski
>>> img = ski.data.camera()
>>> inverted_img = ski.util.invert(img)
9.1.5. 用標籤繪製影像#
label2rgb() 可以用來將色彩疊加在灰階影像上,方法是使用標籤陣列來編碼要以相同色彩表示的區域。
9.2. 對比度和曝光#
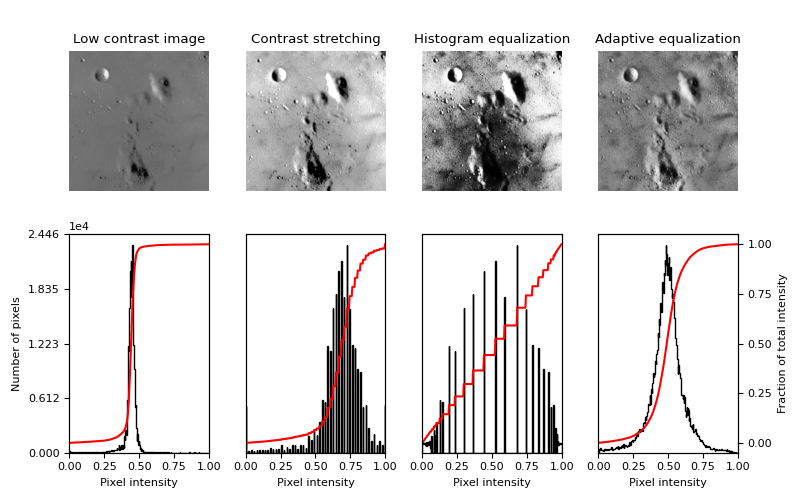
影像像素可以採用由影像的 dtype 確定的值(請參閱 影像資料類型及其含義),例如 uint8 影像的 0 到 255 或浮點影像的 [0, 1]。然而,大多數影像的值範圍較窄(因為對比度較差),或者大多數像素值集中在可存取值的子範圍內。skimage.exposure 提供將強度值分佈到較大範圍的函式。
第一類方法計算強度的非線性函式,該函式獨立於特定影像的像素值。此類方法通常用於校正感測器或接收器(例如人眼)的已知非線性。一個著名的例子是伽瑪校正,在 adjust_gamma() 中實作。
其他方法根據影像的直方圖重新分佈像素值。像素值的直方圖使用 skimage.exposure.histogram() 計算
>>> import numpy as np
>>> import skimage as ski
>>> image = np.array([[1, 3], [1, 1]])
>>> ski.exposure.histogram(image)
(array([3, 0, 1]), array([1, 2, 3]))
histogram() 會傳回每個值區的像素數量和區的中心。因此,histogram() 的行為與 numpy.histogram() 的行為略有不同,後者傳回區的邊界。
最簡單的對比度增強 rescale_intensity() 是使用線性轉換將像素值延伸到整個允許範圍
>>> import skimage as ski
>>> text = ski.data.text()
>>> text.min(), text.max()
(10, 197)
>>> better_contrast = ski.exposure.rescale_intensity(text)
>>> better_contrast.min(), better_contrast.max()
(0, 255)
即使影像使用整個值範圍,有時值範圍的末端權重也很小。在這種情況下,使用影像百分位數來裁剪像素值會改善對比度(以損失一些資訊為代價,因為某些像素會因這種操作而飽和)
>>> moon = ski.data.moon()
>>> v_min, v_max = np.percentile(moon, (0.2, 99.8))
>>> v_min, v_max
(10.0, 186.0)
>>> better_contrast = ski.exposure.rescale_intensity(moon, in_range=(v_min, v_max))
函式 equalize_hist() 會將像素值的累積分布函式 (cdf) 對應到線性 cdf,確保影像中均等地表示值範圍的所有部分。因此,在對比度較差的大區域中會增強細節。作為進一步的改進,可以在影像的子區域中執行直方圖均衡化,並使用 equalize_adapthist() 來校正影像上的曝光梯度。請參閱範例 直方圖均衡化。