注意
前往結尾下載完整的範例程式碼。或透過 Binder 在您的瀏覽器中執行此範例
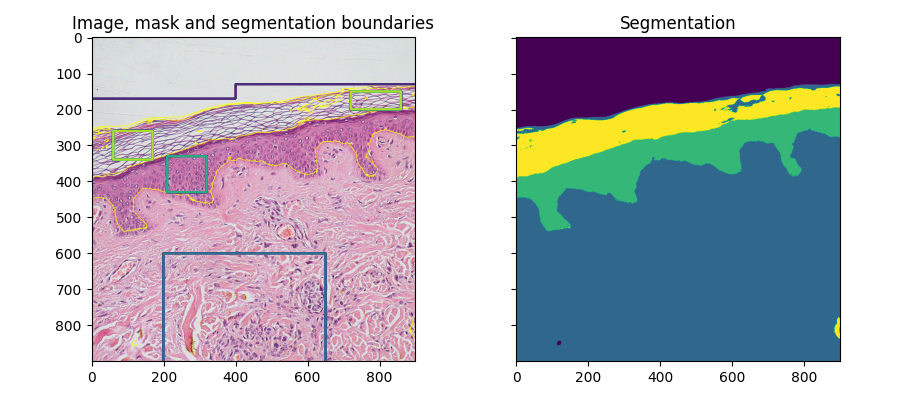
使用局部特徵和隨機森林的可訓練分割#
此處使用基於局部強度、邊緣和不同尺度紋理的局部特徵來計算基於像素的分割。使用者提供的遮罩用於識別不同的區域。遮罩的像素用於訓練來自 scikit-learn 的隨機森林分類器 [1]。然後根據分類器的預測來標記未標記的像素。
此分割演算法在其他軟體(例如 ilastik [2] 或 ImageJ [3](也稱為「Weka 分割」)中稱為可訓練分割。
import numpy as np
import matplotlib.pyplot as plt
from skimage import data, segmentation, feature, future
from sklearn.ensemble import RandomForestClassifier
from functools import partial

full_img = data.skin()

img = full_img[:900, :900]

# Build an array of labels for training the segmentation.
# Here we use rectangles but visualization libraries such as plotly
# (and napari?) can be used to draw a mask on the image.
training_labels = np.zeros(img.shape[:2], dtype=np.uint8)
training_labels[:130] = 1
training_labels[:170, :400] = 1
training_labels[600:900, 200:650] = 2
training_labels[330:430, 210:320] = 3
training_labels[260:340, 60:170] = 4
training_labels[150:200, 720:860] = 4

sigma_min = 1
sigma_max = 16
features_func = partial(
    feature.multiscale_basic_features,
    intensity=True,
    edges=False,
    texture=True,
    sigma_min=sigma_min,
    sigma_max=sigma_max,
    channel_axis=-1,
)
features = features_func(img)
clf = RandomForestClassifier(n_estimators=50, n_jobs=-1, max_depth=10, max_samples=0.05)
clf = future.fit_segmenter(training_labels, features, clf)
result = future.predict_segmenter(features, clf)

fig, ax = plt.subplots(1, 2, sharex=True, sharey=True, figsize=(9, 4))
ax[0].imshow(segmentation.mark_boundaries(img, result, mode='thick'))
ax[0].contour(training_labels)
ax[0].set_title('Image, mask and segmentation boundaries')
ax[1].imshow(result)
ax[1].set_title('Segmentation')
fig.tight_layout()
特徵重要性#
我們在下面檢查了不同特徵的重要性,如 scikit-learn 所計算。強度特徵比紋理特徵重要得多。可以考慮使用此資訊來減少給予分類器的特徵數量,以便減少計算時間。但是,這可能會導致過度擬合和區域邊界之間的結果降級。
fig, ax = plt.subplots(1, 2, figsize=(9, 4))
l = len(clf.feature_importances_)
feature_importance = (
    clf.feature_importances_[: l // 3],
    clf.feature_importances_[l // 3 : 2 * l // 3],
    clf.feature_importances_[2 * l // 3 :],
)
sigmas = np.logspace(
    np.log2(sigma_min),
    np.log2(sigma_max),
    num=int(np.log2(sigma_max) - np.log2(sigma_min) + 1),
    base=2,
    endpoint=True,
)
for ch, color in zip(range(3), ['r', 'g', 'b']):
    ax[0].plot(sigmas, feature_importance[ch][::3], 'o', color=color)
    ax[0].set_title("Intensity features")
    ax[0].set_xlabel("$\\sigma$")
for ch, color in zip(range(3), ['r', 'g', 'b']):
    ax[1].plot(sigmas, feature_importance[ch][1::3], 'o', color=color)
    ax[1].plot(sigmas, feature_importance[ch][2::3], 's', color=color)
    ax[1].set_title("Texture features")
    ax[1].set_xlabel("$\\sigma$")

fig.tight_layout()

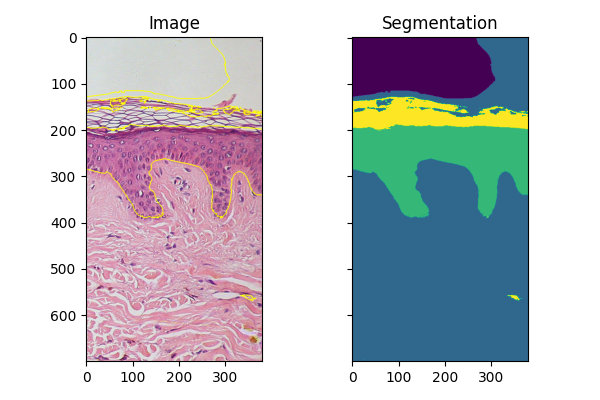
擬合新影像#
如果您有幾個在類似條件下獲取的類似物件影像,則可以使用使用 fit_segmenter 訓練的分類器來分割其他影像。在下面的範例中,我們僅使用影像的不同部分。
img_new = full_img[:700, 900:]

features_new = features_func(img_new)
result_new = future.predict_segmenter(features_new, clf)
fig, ax = plt.subplots(1, 2, sharex=True, sharey=True, figsize=(6, 4))
ax[0].imshow(segmentation.mark_boundaries(img_new, result_new, mode='thick'))
ax[0].set_title('Image')
ax[1].imshow(result_new)
ax[1].set_title('Segmentation')
fig.tight_layout()

plt.show()
腳本的總執行時間:(0 分鐘 6.720 秒)